Showing posts with label Creativity. Show all posts

Saturday, January 12, 2013

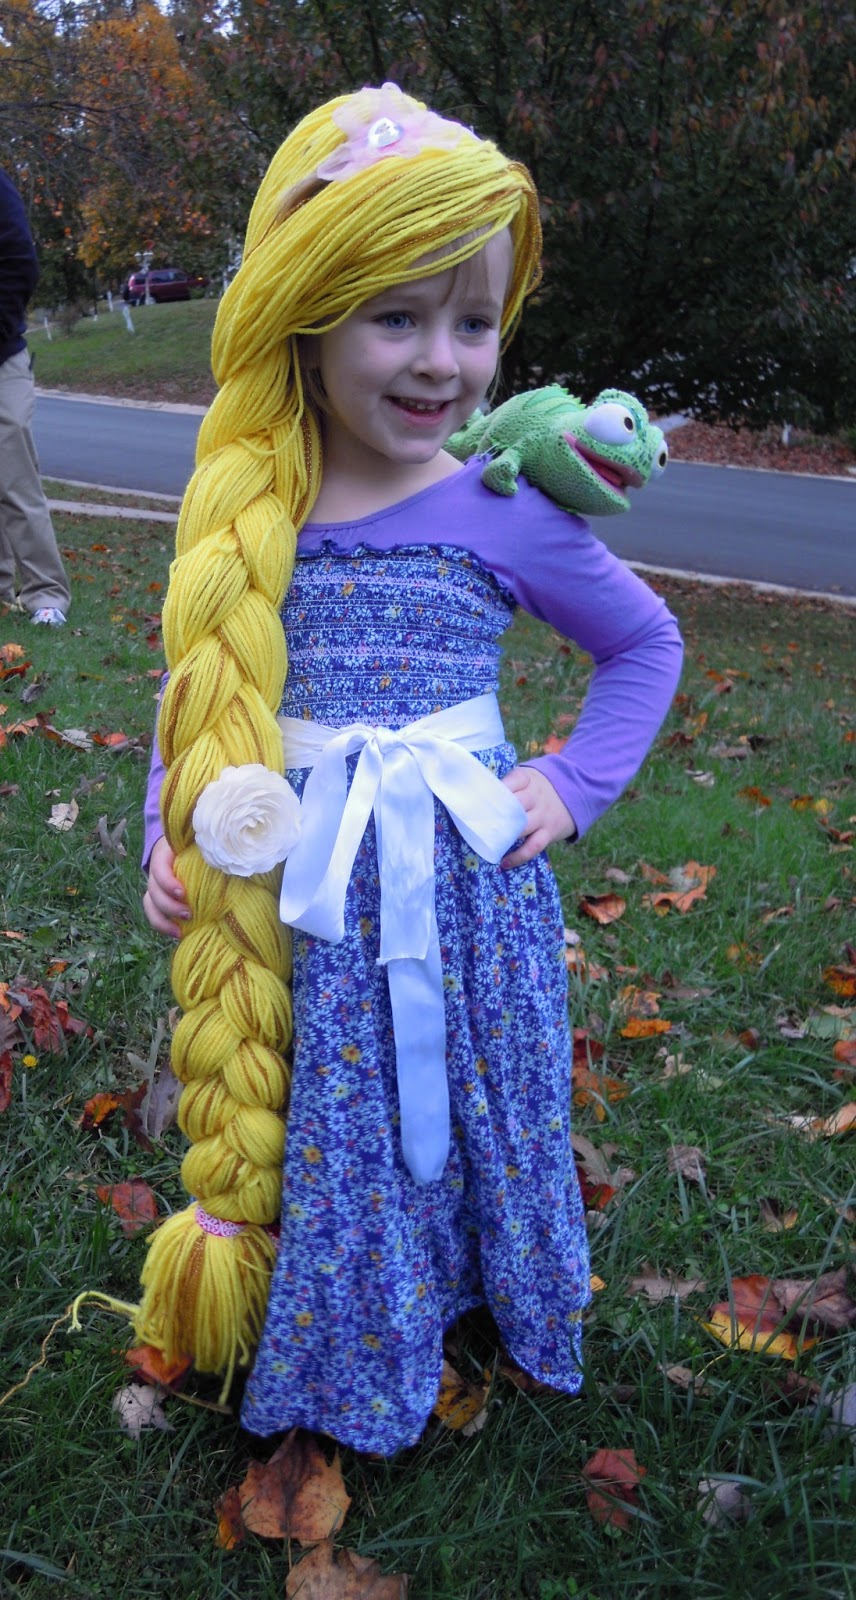
A Rapunzel Dress from Goodwill Clothes

I prepped for this post a little while ago.  It's late.  My camera broke, other life stuff happened, but now I have this awesome Chromebook computer to share how I made Ivy's treasured Rapunzel dress.  Yep, for Halloween, Ivy wanted to be Rapunzel.  I decided to make a dress for her that would be warmer and less commercial than a purchased Rapunzel dress.  Here's how I did it.


  • Skill level:  Easy/Beginner
  • What I used:  A sewing machine; 1 purple long-sleeve shirt (The Children's Place, found at Goodwill); 1 adult size Medium tube-top maxi dress (Old Navy, found at Goodwill).
  • Time commitment:  ~1 hour to go from A to Z:

First, I put the maxi dress on my daughter, up to her underarms.  I pinched the fabric at the seam until it seemed like it would be a comfortable fit.  Then I sewed from the top of the 'pinched' area the same width through the smocked section, and then slowly trailed it off about 1 foot down the dress (not the whole length of the dress).  Finally I cut off the excess.

Next, I laid out the maxi dress and the purple shirt together to create a vision of the final look.  I pinned the top of the smocked/blue dress to the purple shirt at ~1-inch intervals.  HINT:  It helped to line up the seam of the maxi-dress so it's in the middle of the back, because the way I cut off the excess made a nice train.
Then, I sewed (all still right sides out) the smocked dress to the purple shirt.  I used white thread and kept the seam at the very top of the smocked area, on top of another white-ish area so the thread would not stand out.  I sewed around the whole dress twice for strength.  Then I turned the dress inside out and cut off the excess purple t-shirt (the part below the smocked part that nobody would see... although you could leave it on for extra warmth.)

The last step was to cut off all the extra fabric at the base of the dress.  I had Ivy try the dress on, and just eyeball the level we liked.  Then I cut off the excess and hemmed the dress.  The maxi-dress had a lining, and I just hemmed the lining along with the dress.  The lining was not the same width, however, so it made it look a little wavy.  You  may want to hem the dress and lining separately.
Voila!  A long-sleeved, warm, thrift-store, up-cycled Rapunzel dress that my daughter loves, and still wears long after Halloween!  It's versatile enough that she occasionally wears it to school.


Thursday, January 3, 2013

My 20 '13 Resolutions

Will my resolutions stick?
Maybe you already caught some of my resolutions on Liberating Working Moms.  If you didn't, you should!  The other moms' resolutions are very interesting.  I made a longer list and thought I'd share.  Maybe by sharing I'll actually do some.  I realize not all are in 'resolution' type style.  Some are just things I want to do that will add little to no value to my life.  That's ok.
  1. Share more music with the kids.  Music I like and have liked.  I've lost touch with my music.  Let's start digging out my old CDs and playing them in the car.  Mr. Jones and me...
  2. Exercise 30 minutes 3 times per week.  This sounds do-able, except when I actually try to do it.  Yawn... boring!
  3. Love people more.  Purposefully and intentionally, try to actively love.  Actively empathize.  Treat them how they want to be treated.  Love them even if they won't love me back.  Love people without wanting or expecting anything in return.  Ruminate about what it really means to love people.
  4. Add new main-dish veggie dishes to my cooking repertoire.  A real challenge!  Also, stay vegetarian.
  5. Pursue more paid writing outlets.  Take at least 1 step towards branching into print material?  That may be a stretch.  But I do have the neverending book brewing in the back of my mind.... it changes purpose and title and theme and plot... but it's brewing I think.
  6. Limit social media.  Try to check Facebook only once per day.  It has added value to my life....  in ways that deserve another blog post unto themselves.... but it sucks time and more often than not makes me feel worse rather than better.
  7. Refresh my journaling for the kids.  I've kept a hand-written journal for them since they were born.  I need to routinely write to them, even if it's 1 page once a week.  It's a gift to us all.
  8. Bring lunch to work at least 4 out of 5 days.  Forgive myself if I slip up some times.  The salad bar at the cafeteria next door is really good.
  9. Call my parents more than once a week.  I love them and miss them very much.  They rock.
  10. Revisit date night.  Be ok with planning the whole thing myself.  Forgive my husband if he doesn't even think of doing that.  Enjoy the night regardless of who planned it or if anybody has a bad attitude.  Don't go to a movie.  It just pisses us off.... all the cell phones.
  11. Do something bold with my blog.  I'm thinking....  a daily tribute to a Facebook friend chosen at random.  It'd be like hosting my own social media funeral in reverse....  violating #6 but living #3.  A contradiction in resolutions!  I love it.  Another bold idea:  some kind of project to help others tell a story.  I love story telling, especially as it relates to challenging life issues.  [I'm open to ideas!]
  12. Find a church I actually like and want to go to regularly, or come up with a plan to 'home school' our kids on religious issues.  Seek guidance on this from smarter people than I on this subject.
  13. Let my hair grow.  Don't cut it.  Dye it.  Resist the urge to cut it.  Repeat to myself:  I want long hair again.  I never should have cut it.  Don't tame the mane.  Go wild, my inner free spirit child, go wild.  
  14. Don't garden.  Maybe a little, but don't spend more than like $25 on gardening crap.  I'm bad at gardening.  Other people are good at it.  Go buy food from them and hope the grocery-market apocalypse doesn't come so I am not forced to garden for survival.
  15. Don't stop trying to be bold and brave in the blogosphere just because I'm a government employee now.  Free speech and all.
  16. Cuss more.  It feels good.  Not in front of the kids.
  17. Be kind randomly more often, to more people.  I know this is kind of a fad right now.... but I don't care.  I want to do this.  It feels good and makes me happy and the other person happy.
  18. Don't allow people's comments to get to me. Believe the best about people.  Perhaps they did not mean it that way.  That said, I still need to defend myself, my kids and my family when appropriate.
  19. Knock a big hole in the wall between our kitchen and living room.  [May have to save 'repair the wall' for my 2014 resolutions.]
  20. Embrace that I am in the "over 35" category now.  Don't be sad.  Be glad.  I'm happier now than I've probably ever been.  98% of days.

Tuesday, October 23, 2012

How To Make a Tractor Costume {Tutorial}

My son is 2 1/2 and only loves his mom, dad and sister more than he loves tractors.  Specifically, John Deere tractors.  He was just born that way, baby.  It was a no-brainer to try to make him a tractor costume!  Here's how we did it!

What you'll need:
-2 medium sized rectangular shaped boxes.
-Scissors
-Serrated knife
-Marker/ Pencil
-Tractor-colored paint of your choice
-Black paint
-Paint brush or sponge brush
-Duct tape or packing tape


Difficulty level:  Not easy, Not hard                  
Time Commitment:  Over the course of several hours and drying overnight
Can kids help?  A little bit

Instructions:
1) Choose your boxes and arrange them the way you want them to be for your tractor.

2) Cut holes in the top and bottom of the larger upright box where the child will stand.  Then, connect the boxes together.  For our tractor, I used the top end flap on the touching end of the shorter box and stuck into the larger box through a cut slot, and taped it inside.  Then I did the same with the bottom end flap like this:


3) Secure all seams with more duct tape!
{Step 3.5:  Have fun with kids playing with the other boxes!}

Step 4) Break out the paint!  We chose to do a fancy stripe.
Step 5) Make the wheels!  I used a dinner plate to make templates.  For the 'small' front wheels, I used the actual plate size.  For the 'large' wheels, I cut a larger circle around the template.


Step 6) Add the wheels and embellish how you like!  We glued on the wheels but I wanted to use brads so they would roll around.  Oh well.  We used duct tape to make fake windows and headlights.  We've also since added shoulder straps by connecting some ribbon to the front and back of the body opening...  but baby boy doesn't like them.  


Step 7) ENJOY!  {And hope and pray the costume makes it to Halloween!  Have a backup plan :).}


Wednesday, June 20, 2012

The Ivory Soap Trick

GASP - I actually did something with the kids that I saw on Pinterest!  And.... drum roll...It was pretty cool!  I was advised that it will ONLY work with Ivory soap.  One of the main ingredients in Ivory soap is water so perhaps that is why this works. 

From this....                                                     To this!
 
Easy peasy steps: 
1) Get a bar of plain white Ivory soap. 
2) Place on a paper plate in the microwave.
3) Microwave for about 1 minute.
4) Look what happens scroll down to see the video and please excuse my dirty microwave)!  

The result is kind of like a hardened flaky dough.  We tried to mold it and cut shapes out of it with cookie cutters.  It worked OK... we made a few pretty little leaf shapes.  Maybe if we had nuked the soap in chunks and taken it out a little sooner, the whole cookie-cutter idea would have worked better.  I bought a 10 pack of soap so we'll try that next time!


<3 happy soap nuking!
mB

Thursday, February 2, 2012

Toddler Friendly Knock Knock Jokes!


Big Sis is obsessed with knock-knock jokes these days. We've made up some fun ones and I've found others she loves. Who doesn't love a good knock-knock joke? What are your favorites?

Knock Knock Who’s there? Olive. Olive Who? Olive you! [I love you!]
Knock Knock Who’s there? Valen. Valen Who? Valentine I love you!
Knock Knock Who’s there? Woo. Woo Who? Woo hoo let’s party!
Knock Knock Who’s there? Atch. Ach Who? Bless you! You sneezed.
Knock Knock Who’s there? Moo. Moo Who? Why is there a cow in here??
Knock Knock Who’s there? Hoo. Hoo Who? How did an owl get in here!
Knock Knock Who’s there? Yoo. Yoo Who? You who – where are you?
Knock Knock Who’s there? Peek-a. Peek-a Who? Peek a boo!
Knock Knock Who’s there? Boo. Boo Who? Why are you crying?
Knock Knock Who’s there? Leena. Leena Who? Lean a little closer to me!
Knock Knock Who’s there? Senor. Senor Who? Seen your underpants!
Knock Knock Who’s there? Canoe. CanoeWho? Can you lend me some money?
Knock Knock Who’s there? Butter. Butter Who? Butter open the door quick!
Knock Knock Who’s there? Yo. Yo Who? Yo’ mama!
Knock Knock Who’s there? Gorilla. Gorilla Who? Gorilla cheese sandwich for me!
Knock Knock Who’s there? Orange. Orange Who? Orange you happy to see me?
Knock Knock Who’s there? Coocoo. Coocoo Who? Coocoo-ca-tchoo!

Tuesday, December 27, 2011

New MyMemory Samples and Giveaway January 5th!

I am a very serious person and would not pull your leg.  MyMemories has some seriously cool software!  I am showing you some more samples of what you can do.  I used one of the Holiday templates - free with the software - that had 6 pre-designed beautifully laid out pages.  It was so easy to upload my pictures and move the design elements around.  I love the idea of doing a 'family recipe' page or even a whole book!  The prices for printing books are very reasonable and much cheaper than buying all the scrapbook supplies and starting from scratch!  Keep reading!
 
I am giving away a copy of the MyMemories Digital Scrapbooking software to one lucky reader!  I am requiring at least 10 entries - so enter now!  To enter this giveaway, simply visit the My Memories Suite webpage, choose your favorite design, and tell me how you'd use the design and the software!  SWEET!  (Drawing will be held January 5th!)  *BONUS entry if you also become a follower of my blog or LIKE the MyMemories Facebook page!

I
f you can't wait until then or don't win enter the following code to receive a $10 discount off the purchase of the My Memories Suite Scrapbook V3 software and a $10 coupon for the MyMemories.com store - $20 value!   
STMMMS40533 

Tell your friends and family to do this too!  I LOVE giving free stuff away!  

Wednesday, December 14, 2011

A Christmas My Memories Giveaway!

It's baaacccckkk! 

I am hosting another MyMemories Suite software giveaway!  The best part is -- I'll be giving away the software on Christmas day - December 25th!  You can enter to win for yourself or a friend or loved one.  

If you haven't checked out MyMemories lately, you should.  They have just released Version 3 of the software and the new features are so much more user-friendly.... which is great because they were pretty user-friendly before!  It flows with how you would naturally make a paper scrapbook page. 

It is easy to import pictures, and there are so many free nicely designed page sets of all sizes that come included!  Also, MyMemories gives away free paper sets regularly.  To the left are just a few pages from one of the included paper sets.  I didn't design these - just did the 'automatic import' option.  I just wanted to give you an idea.  There are tons of cool embellishments like flowers of all colors, buttons, stitching, and so much more.


 To enter this giveaway, simply visit the My Memories Suite webpage, choose your favorite design, and comment below telling me how you'd use the design and the software and you could win a free copy of the My Memories Suite Digital Scrapbooking Software!  SWEET!  (Drawing will be held Dec. 25!)  *BONUS entry if you also become a follower of my blog or LIKE the MyMemories Facebook page!

Here's the best part:  If you can't wait until Christmas, enter the following code to receive a $10 discount off the purchase of the My Memories Suite Scrapbook V3 software and a $10 coupon for the MyMemories.com store - $20 value!   
STMMMS40533 

Tell your friends and family to do this too!  I LOVE giving free stuff away!  Trust me - this is worth it if you love scrapbooking or doing creative projects with photos!

Sunday, November 27, 2011

Semi-Homemade Aurora Crown


My child so badly wants to be a princess some days.  Today was one of those days.  We have princess decals in her room and she always points to either Belle or Sleeping Beauty (Aurora) and says - When I grow up, I'm going to have that hair, and that dress, and hold that thing (a fan) and have a crown like that and be a princess.  It is perhaps the cutest thing ever, since the most recent thing my children did that was the cutest thing ever, like 5 seconds before that.  So today we indulged her a little and made a crown!  And okay, we were both a little bored.... 4 days at home!  A pleasure, and a challenge!  So I googled "aurora crown" and we found this simply adorable pattern.  However, we didn't have craft foam or jewels.... so, enter tin foil!  Here's what we did:  1) Trace the template in the pattern on card board.  Cut out!  2)  Cover it with glue and wrap with tin foil ("silver" as Big Sister called it) 3)  Find a head band that she never wears and glue the 'silver crown' to it, held in place with clothes pins for ~30 minutes 4) In the mean time, make 4 "jewels" by covering diamond (or whatever) shaped pieces of cardboard with tin foil.  Crayons worked okay for giving the 'jewels' a hint of color.   5)  Glue the 'jewels' on the 'crown' in your desired pattern.
Presto create-o!  An aurora crown that Big Sister has worn all day!  And we didn't have to purchase a single thing or make a trip to the craft store!

Friday, November 25, 2011

A My Memories Calendar? Priceless!


SPOILER ALERT:  I made a calendar for a family member for Christmas using the new My Memories Version 3 software.  Yep - they've upgraded and the software has some very cool new features!  One of my favorites so far is the ability to easily make a calendar using either pre-designed scrapbook templates (you get a very nice selection with high-quality looking papers and designs) or templates you design yourself!  You can choose either the standard 12x12 scrapbook page size OR a normal sized 8-1/2 by 11 paper size.  This is SO much easier with Version 3 than the previous version.  
An example of what I did for my calendar is posted to the left.  In total, for a 1-year calendar you will need 26 pages:  You create a cover, each of the designed/ photo pages (which you can actually pre-load with pictures you select into a separate file), each of the calendar pages, and a back cover.  You'll need to 'map it out' to make sure you have the order right, and the number of pages depending on the months you want.  For a 2012 calendar, it cost me $17.99 plug shipping. 

You too can make a calendar like this!  The software is normally $39.95 but you can use my special discount code to get $10 off plus a $10 coupon to use on the online store.  The code to get the discount is STMMMS40533 on the My Memories Suite webpage.  Have fun!  I sure did!

Tuesday, October 4, 2011

More with My Memories

So - even though I've already given away the free copy of the My Memories software, you can still use my code to get $10 off plus a $10 coupon for the online store.  I should be sleeping but instead I'm playing!  Look what I did in the past 20 minutes or so.  I didn't have in mind what I wanted to do, but I took a few pictures from a trip we took in the early Spring to UNC Chapel Hill.  I like the way it turned out....  this was one pre-designed page of a 5-page album but I changed the photo layout very easily, adjusted the photos to black and white and added the word "family."  What do you think?  Pretty cool huh?

The code to get the discount is STMMMS40533 on the My Memories Suite webpage.  

It would be great for making a Holiday letter, wedding album, baby album, calendar for a gift and much more!

Sunday, September 25, 2011

Pedicures: Pathway to Peace

10 years ago I was in the Peace Corps in Togo.  50 years ago the Peace Corps began.  I missed all the anniversary festivities this weekend in Washington DC because of rain, kids and life.  That's ok.  I don't need to go to festivities to remember my time there (though I do crave Togolese food something awful!).  I think about it almost every day.

There are threads that run through life that connect people, places and moments through time and space.  Oddly enough, Pedicures are one of those threads for me.

One of my favorites memories from the early days in my village began with pedicures.  I remember the first nights being in self-imposed seclusion in my house, not comfortable speaking the language, not comfortable with the dark of night, with only using a lantern to get around, with being an object of curiosity.  I would shuffle about in my little house, feeling all of the children's eyes peering at me from outside.  Fish in a bowl - that was me, except the barrier was a mixture of culture, awkwardness and curiosity. 

Former Peace Corps volunteers had recommended packing nail polish.  One night, I wanted so badly to make a connection with my new 'family' outside and so I finally remembered - the nail polish!  Be bold!  Be brave!  Be enameled!  None of us could speak to each other, but I opened the door and showed them all the colors of 'vernis.'  Floodgates open!  Within minutes, all the children were in my house and it was the biggest pedicure party I'd ever seen!  They spoke to each other, tried to speak to me, I tried back, and somehow we all got our nails done and made friends.

From that night on, pedicures happened pretty regularly, which opened the door for card-playing, hand-clapping games, and even the littlest ones trying to teach me the local language.  I finally had friends who eventually became like family and I miss them dearly to this day.

Peace through pedicures.

Tonight, the kids and I did pedicures!  Somehow, that same magical thing happens in our house when we bust out the nail polish.  Even the guys want in on the action!  Hurt feelings get smoothed over, tears and frustration are gone for a short while and none of us have to be on the same page to be happy with each other....  as long as after everything, nails are blue or pink or red.... with sparkles of course!

What problems have you solved with nail polish?  :)

Thursday, September 22, 2011

My Memories Suite Giveaway This Weekend!!

I am so excited this giveaway that I can't wait any longer.  I'm giving away a FREE copy of the My Memories Suite Software this weekend!!!

How to win:  Simply visit the My Memories Suite webpage, choose your favorite design, and comment below telling me how you'd use the design and the software!  SWEET! 
*BONUS entry if you also become a follower of my blog or LIKE the MyMemories Facebook page!

If you don't win or can't wait, I have something for you too!  Simply enter the following code to receive a $10 discount off the purchase of the My Memories Suite Scrapbook software (making it $29.97) and a $10 coupon for the MyMemories.com store - $20 value!  STMMMS40533

Tell your friends and family to do this too!  I LOVE giving free stuff away!  Trust me - this is worth it if you love scrapbooking or doing creative projects with photos!  It's great for the working mom to save time, money, space and hassle.  Look at what I did this morning in 10 minutes!

Monday, September 19, 2011

Mommy Haiku

Lollipop lovers
M&Ms melt in their hands
Bathed in saliva
But not in the car seat

Driving home from school
Humming along to veggies
Who sing about God

Cars at the daycare
Bland colored piano keys
Running to and fro

Ballet class.  Pink walls.
Tiny feet, moms' finger tips
Tap tapping away.

Naked baby blast!
Shake your booty in the bath tub!
Happy artist time!
Bubble manicures.

(Former title:  Tired mommy 5-minute red light break time Haiku.)

Share your mommy haiku with me!

Friday, September 16, 2011

More Fun with My Memories - and a Rule Change!

Ok.  Clearly I am not in sleeping mode tonight.  Plus it's a Friday night and what better way to party in my jammies than to play with the My Memories Suite scrapbooking software?  Let the good times roll!

But seriously - Look what I've done!  I did these pages in about 15 minutes.... plus my cool new banner for my blog (see top of page).  I am feeling pretty positive about my creative crafting skills right about now!  I used a template for a whole book that had about 10 pre-designed pages...  but you don't have to use them all and you can change the layout and add words, embellishments, ribbons, bows, more photos... and it's super easy to use.  If you can use a computer, you can figure it out without a manual.


Also I've changed the rules for my FREE giveaway!  I can't wait until September 30, I'm too excited!  So I'll give away the My Memories software to a lucky reader once I get 1500 page views on my blog so spread the word!  If you'd love to have the software and haven't done so yet, visit the My Memories Suite page, pick a layout you love and 'comment' on my blog telling me how you'd use it.  Extra 'entries' for following my blog and 'liking' the My Memories facebook page!  (You have to tell me you did that).  Also make sure I know who you are when you 'comment' :)

Finally - if you can't wait or don't win, use my CODE to get $10 off the software PLUS a $10 store coupon - a $20 value!  That's $29.97 after the coupon!  A great deal.  The code is STMMMS40533. 

Good luck - and good night!  I'm going to bed!

Wednesday, September 14, 2011

Digital Scrapbooking with My Memories - My First Giveaway!

You may not know that I love scrapbooking.  Over the years I've made quite a few but when Big Sister and Baby Genius came along, all scrapbooking ceased.  What's sad is this is the time when I really wish I could do more of it to put the HUNDREDS of pictures we take to good use AND compliment my journaling with beautiful photo books.

{Insert a shout-out to my mom, who has made several scrapbooks for me and my kids!  But there's just something about doing it yourself... you know?}

Enter:  MyMemories Suite Software.  I am flattered that they found my blog and approached me to try it out and tell people about it.  It is the coolest thing!  Look what I made in less than 10 minutes.  It was super easy, fun and fast.  I would not lie to you.  And the coolest part is I can print it, download it, email it, make a book, a JPG, share it on Facebook or whatever!  There are lots of pre-set pages or you can design your own; there's a nice selection of embellishments, paper choices, and so much more! 


The price is pretty decent too - $39.97 for the software (or $29.97- keep reading!).  I once tried one of those online upload-your-photos and make a memory book.  I had a Groupon and still paid something like $30 for the small, basic book.  For almost $40 you can make unlimited pages - a much better deal - AND you can make books, calendars, movies....  lots of cool things!  This would be a GREAT tool to make home-made Christmas cards and gifts!  (Think... calendars for the grandparents...)  Truly if this is your 'thing' you should check out the website:  My Memories Suite.


Here's the best part:  For my readers, enter the following code to receive a $10 discount off the purchase of the My Memories Suite Scrapbook software and a $10 coupon for the MyMemories.com store - $20 value!  STMMMS40533! 

But Wait!  There's More!  I also have a FREE giveaway for a lucky reader!  Simply visit the My Memories Suite webpage, choose your favorite design, and comment below telling me how you'd use the design and the software and you could win a free copy of the My Memories Suite Digital Scrapbooking Software!  SWEET!  (Drawing will be held Sept. 30!)  *BONUS entry if you also become a follower of my blog or LIKE the MyMemories Facebook page!


Tell your friends and family to do this too!  I LOVE giving free stuff away!  Trust me - this is worth it if you love scrapbooking or doing creative projects with photos!

Wednesday, January 26, 2011

Pedicure in Winter

[Originally my blog was called "Pedicure in Winter" but I have sinced changed it to "Clip Clop Mama."

So why, "pedicure in winter"?  Well let me tell you a little about pedicures and me.  I discovered pedicures a few years ago with a good friend of mine.  If you haven't, I highly recommend you visit a nail salon near you for a pedicure A.S.A.P.  A pedicure delivers all sorts of luxurious, delicious things for your mind and body in a short period of time for relatively little cost ($20-$30 typically).  If the salon does not have the spa massage chairs, find a new salon.  While you get massaged by the chair, your feet and legs get massaged and pampered by another person; all the grime and grit is removed from your toes (ick!), and you leave with pretty, pink toes feeling revived and refreshed.
    But wait.  One of the best things about a pedicure is getting to show off your pedicure during the Spring and Summer in pretty, open-toed shoes... right?!  Pretty flip-flops or sandals, preferably.  One might even ask - why even bother with a pedicure in winter?  In the winter (unless you live in year-round summer type places), you get your lovely pedicure just to cover it up with socks and boots.  Nobody sees it.  What a bummer.
     Transition to my life.  As a new wife (of 5 1/2 years) and mother (of a 2 1/2-year-old beautiful girl and 10-month-old simply adorable boy), this is sometimes how I feel - like I have a "pedicure" (all these lovely little things I used to enjoy like poetry and writing and painting and making collages and pottery) that get covered up and pushed aside by daily life.  Understand that my priorities have changed; I have other needs that occupy my time (read:  changing diapers, playing with play-doh, grocery shopping, giving baths, paying bills - the usual!).  And I love those needs!  I love my family with every bit of my heart!  Don't misunderstand me:  my kids and my husband and family are my life.
         On the other hand, I really miss my creative self.  Not that I was every very good or professional at any of my creative endeavors, but they made me *feel better*.  By returning to them and doing a better job at integrating creativity into my everyday life, I feel I will be a better  wife and mother and, bonus, happier with myself! 
         Friends, I have gotten lost in the "Why Get a Pedicure in Winter?" mistake.  Just like there are perfectly wonderful reasons to get a pedicure in the winter (Reasons to Get a Pedicure in Winter), there are wonderful, great, awesome reasons why I - as a full-time mother and wife (at least this one!)  - need to find creative outlets and let my 'pink toes' shine.  I need to return closer to a feeling of 'self' and 'centeredness,' and I have several goals to get me back to the enjoyment and fulfillment I once felt (on occasion any way) from expressing creativity.  Yes I am busy.  I am a mom and wife trying my best to raise two kids and be a good partner and responsible adult and upstanding citizen.  But I dream of making the most of my time on this planet; we all only live once unless reincarnation turns out to be real.
         I've read that the best way to accomlish goals is to begin by writing them down (How To Accomplish Your Goals in Life).  So here we go.  I will  hold myself accountable through this Blog. 
1.  To do a weekly art craft with my children.  (This is my 'low hanging fruit'!)
2.  To make a quilt from fabric I brought home from Africa that I've had for 10 years, within 2 years
3.  To write and publish a children's book or other e-book during the coming year.
4.  To compile and publish a book of poetry during the coming 2 years.
5.  To write and publish a book based on my Peace Corps experience within 5 years.
I look forward to gaining readers on my journey who will hold me accountable....  and I am excited to hear your thoughts, opinions, comments and hope to have a lot of fun along the way!